Friday, October 29, 2010

Halloween Milk Carton Carrier


Check out this cute Milk Carton Carrier for Halloween. This was a swap from the Stampin' Up! convention in Salt Lake City this summer. One of my great swappers (sorry, I have misplaced my swap list and your name, but I'll edit when I find it) made this swap for my Dreamy 3D swap that I organize every year.
The Milk Cartons are made my using the Big Shot and the Milk Carton Die. So easy, peasy, just add paper, cut, fold, stick, and your done. The milk carton carrier is made by using the tutorial from Becky Roberts, Inking Idaho, LOVE her blog and her tutorials.
Here is the side view of the carrier. You could add 2 more milk cartons in the carrier or some yummy treats wrapped up in a cello bag. LOVE that bat punch too!

Happy Halloween & Happy Crafting!

Thursday, October 28, 2010

Vintage Sewing Cabinet Before and After!


Last week I found this beauty on Craigslist. My husband thought I was crazy, I made him ride with me over to pick it up. He has learned to go with the flow of my craziness though. I have been looking for something small to keep in my mudroom. With winter approaching I keep feeling the need to get organized.

Oh yeah, those are totally cherubs on the front. Nice don't you think?!
I sprayed the whole thing (including the inside) with American Accents Heirloom White (my go to spray paint color). After several coats, I decided that this cute little cabinet needed something more.
So I Modge Podged (my first ever attempt) some of Stampin' Up!'s Elegant Soiree Designer Paper on the top and the drawers. I kept the original hardware, gold really isn't my thing but I thought they were still fitting.
Since the cabinet is wider than 12 inches I had to piece the papers together to make them wide enough and added an accent piece.
I then took some of Stampin' Up!'s taffeta ribbon and Modge Podged it in the grove around the top.

So excited that this project turned out! Have to say that it is $25 well spent in my book at least. I am now throwing around the idea of making it into a charging station for our phones, ipod, and camera. However this would require my cousin coming over to put a new outlet into my mudroom.....hm...I bet I could get him to fix a few other things. :)

Happy Crafting!

Friday, October 22, 2010

Scrapapalooza All Day CROP Fundraiser!

Scrapapalooza 2010

Scrapbooking Fundraiser


What: Day-long Scrap Booking Extravaganza

When: Saturday November 6, 2010 - 9 am to 10 pm

Where: The Space, 25 Division SE Grand Rapids, MI

Why: All Proceeds go to West MI Wolves Scholarship

fund

Cost: $40 per Scrapbooker


What is included:

* Breakfast * Lunch * Dinner * Snacks * Beverages

* Use of 8 (yes eight) Sizzix or Sizzlits Alphabet Sets

* Use of a Cricut Die Cutter!!!!

* Entrance into hourly prize drawing (14 drawings total).

* All prize packages valued at $20 or more!!!!!

* At least three scrapping “challenges” with prizes


Extra Goodies:

* Stampin’ Up Make and Take by Tara Angus

* Creative Memories consultant

* Gina's Scrapping Haven

* Professional Massage Therapist will provide table massages at $1 per minute with 50% going

back to West MI Wolves.


And Even More Extra Goodies:

The first 50 PAID participants to register by Saturday, October 30 are guaranteed a goody bag valued at $20+.

Valet Parking


Handmade Holiday Promotion!


Dress Up Christmas Promo Image 1
Dress Up Christmas Promo Image 2
Dress Up Christmas Promo Image 3
Head on over to my website for more details and to order today! 24/7

Monday, October 18, 2010

Halloween Is Almost Here!


I thought today I would post a few of the great Stampin' Up! convention swaps that I received this year. Plus, they are Halloween themed! I am having so much fun stamping and decorating for Halloween this year. Here we go!Check out this great Halloween technique card that Karen Albin made. She used the embossed wax paper technique for the background. The quick story is: Use an embossing folder in your Big Shot with wax paper in the folder, this will "dry emboss" the wax paper. Sandwich your wax paper in between 2 pieces of glossy white cardstock. heat up your iron and iron the glossy cardstock. Peel waxpaper off glossy, and let cool. Brayer the glossy cardstock to bring resist to light. Pretty cool hun.
She used the Haunted House Stamp Set.
Here is a reverse making card that Theresa Argonza-Gomez made. Short story on this card is that she made a mask/stencil out of the scraps after using the Big Shot to cut out a tag from the Two Tags Die. Sponge the background and then stamp overtop.
Stamp Sets Used: From the Crypt & Teeny Tiny Wishes (my fav!)
The last card is a surprise card by Lisa Horton. Although it is beautiful from the outside, the inside is even better!
Check out that inside vignette!
The gravestone is mounted on "springs" so that it becomes a pop up card when you open it. Great idea!
Stamp Sets Used: From the Crypt, House of Haunts, Wicked Cool, Graveyard Gala

Monday, October 11, 2010

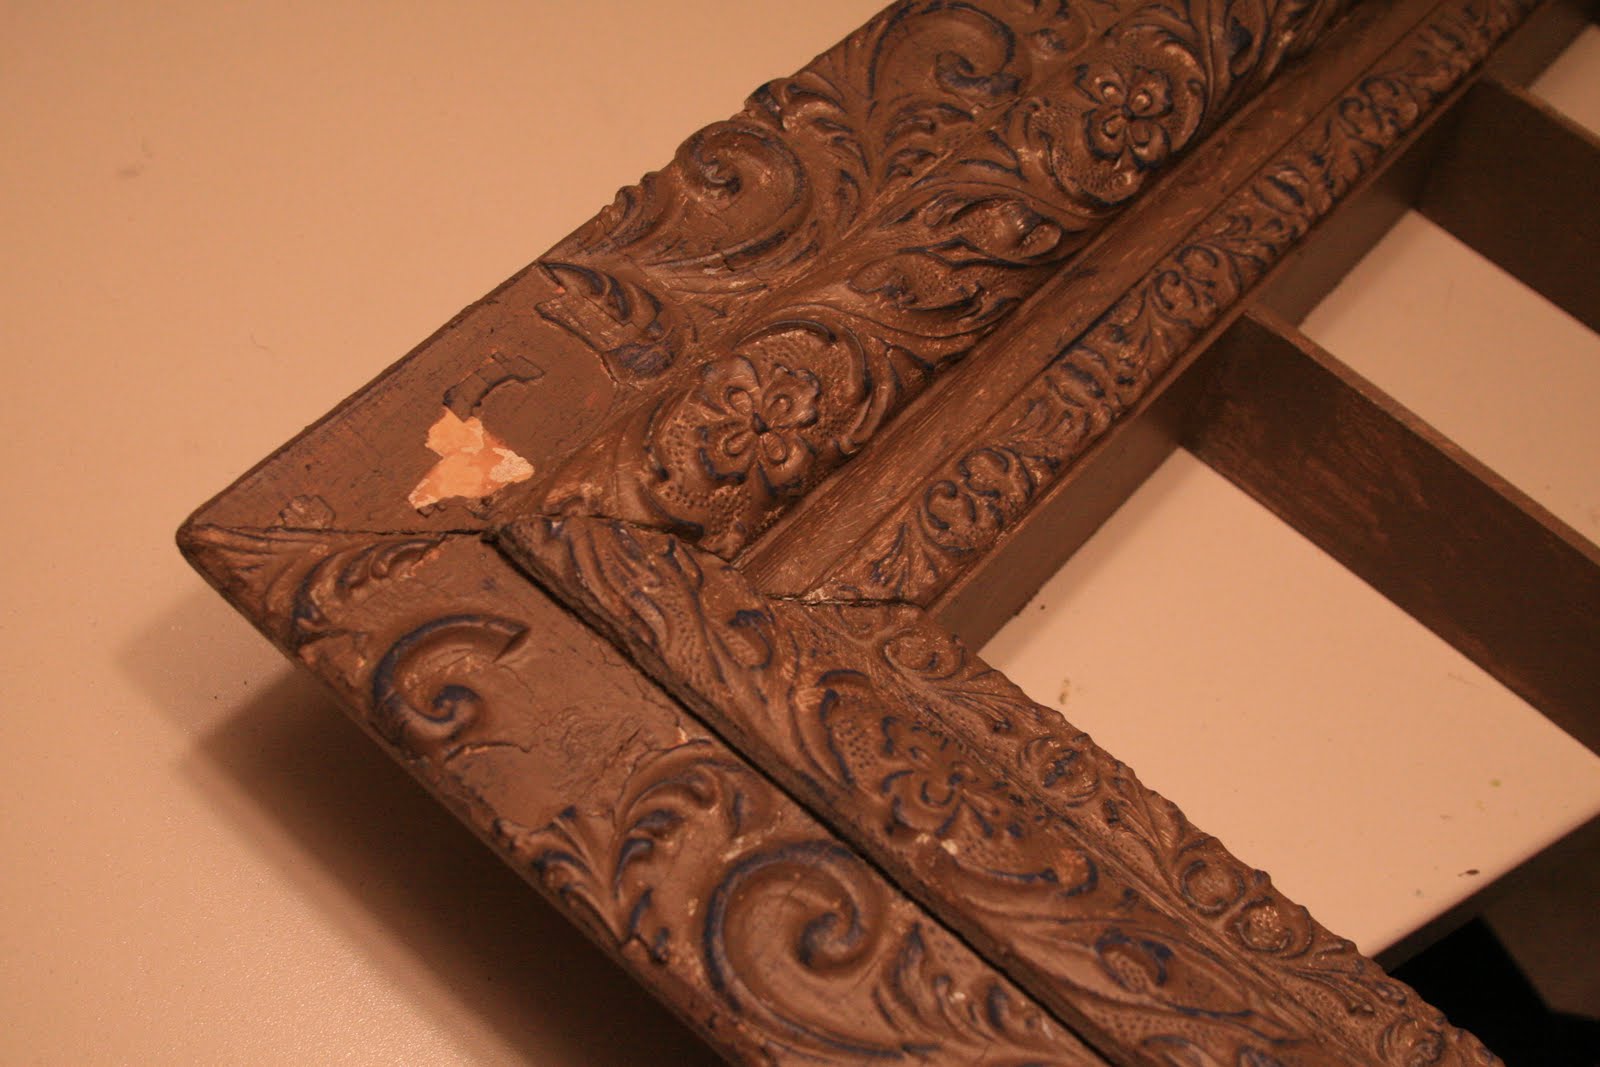
How to: Fix a Snazzy Antique-ish Frame Before and After

This summer I went to a great garage/stamp/craft sale with my crafting partner in crime. While I was wandering about I found this great frame shelf for sale. Loved it! The best part is it was only $10. I figured hey for $10 I'll buy it (totally how I operate) and if it doesn't work well, then I'm only out $10 or I'll find someone who it would work for.

The only issue was the minor damage to the frame. It really wasn't a deal breaker because I knew I was going to paint it anyway and I was pretty sure I could fix it. :)
Oh, I forgot to take a before picture because I was SO excited to work on fixing it. Just use your imagination and you'll be fine.
Although, I would love to claim this trick I can't but I can't remember where I heard it first. I am thinking, Martha, Extreme Home Makeover, or the Create Channel (I do not have cable so we can eliminate the HGTV channel). Anyway, whoever it was had a snazzy cake decorating bag with all kinds of tips that they used and probably used a different type of material. Time for a true confessional: I do not cook nor bake. Nope, I just used my electric skillet for the first time and it was on a craft project. I am a great collector of cookbooks and fancy kitchen things though..... someday, someday.... So, I did not have a cake decorator bag in the house and honestly I didn't want to spend the extra $ on one. I though about the old hole in a baggie trick, but then went to Lowe's. Oh Lowe's. They must of known I was working on this project because they made the perfect product just for ME!
I cut the tip at a fairly wide angle because my repair job detail called for a wider swirl. Then I squeezed it onto the frame (as in the pictures) to replicate the matching piece.

The patch looks really really rough at this point, doesn't it?!
I simply let it dry over night, maybe 2 nights, till it was good and dry. Then I took my Stampin' Up! sanding block (perfect for this project) and sanded off the roughness on the top and smoothed it out. You have to be VERY careful while doing this. Slow and gentle is the name of the game.

Here it is! Isn't it lovely?! All I did after sanding and blowing the dust off was take it outside and spray paint it. I put several light coats on letting each dry in between.
This is the perfect display for some card examples in my classroom area.
Here is the corner that I "fixed". I feel that it blends in quite well now that it is painted and hung. No one would ever know if I didn't tell them. :)


Pretty good for $10, some spackling, and a can of spray paint! LOVE IT!

Thursday, October 7, 2010

Halloween Banner: Pennant Die

I saw some great fabric at the store a while back and walked away. I didn't need it or know what in the world I would do with it. Then last week it hit me, a halloween banner must be made with it! So I made one.
Using the Stampin' Up! Pennenant & Serif Essentials Alphabet dies I got to work.
I simply cut out the fabric with the Pennant die and cut the letters out of glitter felt. Then I attached the pennants to the Old Olive 1 1/4 Striped Grosgrain Ribbon using hot glue. After that I glued the letters onto the center of the pennants. So easy but yet looks great!
Although the letters do not show up real well in these pictures, in person they really shimmer just enough to make a difference.
Love it! Thinking about making your own pennant? Love the pennant die? Head on over to my website to get your hands on one of your own! Click here!

Happy Crafting!